
A collection of tips and tricks not found in the rule book. Lots of little helps to improve your game.
Before the Game
Remember to have fun! We all play for different reasons, but it’s just a game at the end of the day.
Organization saves time. Get something to store your stuff, organize tokens with a holder, buy a mat from a 3rd party site (though if you’re meeting up with a group or at a FLGS, they will probably already have one), and get ready to have a lot of plastic and cardboard.
Separate home storage from taking a list to the store?
Recommended tip: When gathering cards for your squad. Use colored sleeves to identify what upgrades go to what pilot. For example, if I fly Luke and Wedge, I use red sleeves for Luke’s cards and green sleeves for Wedge’s cards. Saves time trying to sort 30 cards at the table. Clear sleeves are fine for double-sided cards. There aren’t a lot of them to start with. I keep them all in a deck box with the damage deck, and my list printout.
One of the first tackles I see are new players sifting through piles of tokens or templates each turn. Their movement templates are in piles, and they hunt for them. They can’t find a focus, and they don’t know which tokens are. Organize and stay organized so you can focus on your game.
Start with a cheap tackle box or organizer from a sporting goods store and expand outwards. Avoid bags unless you have enough for each token type. This helps set up and break down quickly, a hard skill to tackle.

*For example, this container was purchased at the dollar store.
Many shops on Etsy have very nice 3rd party tokens and maneuver templates. Most are acrylic, but there are also wood (though they may warp) and metal options. These add-ons aren’t necessary, but upgrading the maneuver templates is always highly recommended.
For organizing your whole collection, there are two ways to go that are recommended. First, use bigger organization containers. Brands such as Plano, Harbor Freight, and Stanley work well. Second is foam storage, Feldherr foam being the most popular. Cards can be put in binders or cardboard card storage boxes.
List Building
Some upgrades won’t make good on their return investment. You may have negative fun trying to make them work. Try everything, but this is good to keep in mind!
Getting advice from a Discord channel community helps. For example, I did not know that the Fearless Talent on Dengar (Jumpmaster pilot) did not work because it applies to primary weapons and not on turrets arcs. And thus, I was in a real shock when I brought it to a tournament and was told it did not work. (So negotiating with the tournament organizer (TO) for an alternative is helpful in cases like these. They can be more forgiving than the Emperor.)
Some ship abilities will always feel bad or not do very much. But the pilot may still be worth it if their price/loadout is efficient.
More upgrades are not always better. Sometimes having a simpler list is more effective because you are less likely to miss opportunities. It reduces your mental load and allows you to focus on flight instead of remembering every trigger for your list.
Passive mods are generally better than action mods. For example: a force charge is always around, while the focus action might not be available.
In a tournament setting, flying what you’re familiar with is generally better than something meta you don’t know. Of course, flying what you think is fun is best. It is recommended by GSP that you fly your list for at least 5 matches (in various scenarios) to get a better idea of how your ships fly. (See the Practice section below.)
Setup
Always forgetting triggers? If it has a token, put it on the mat next to the ship. Use a Lego minifig, random token, or anything on the mat next to the ship so you don’t forget.
Don’t be afraid to ask your opponent what’s the deal with their list. It’s useful to know what cards they have as you make your decisions throughout the game.
Some people learn better by living with their mistakes, some by taking it back. Talk with your opponent about how you feel. Most will be helpful with their way.
Talking through decisions mid-game with your opponent may be helpful. They won’t give everything away, but they can provide insight for decisions that are better choices. Again talk with your opponent about this at the beginning of the game and see if they’re cool with it.
Strategies
Preflight checks: Scenario – which one is it and how do you score those points? Target/Objective Priority – Who should you try to kill first? A cheap ship you can kill quickly or a high-value target that’s worth a lot. Also who’s gonna be tagging the objectives? Obstacles – Where are you going to put them? Do you need big open lanes, need to make a mess for your opponent, etc.? Deployment – Where are your ships going? Tight formation, spread fine, reactive to your opponent’s placement, etc.
I (try to) identify what I need to kill on my opponent’s list. I won’t win a game against the Republic if I don’t kill ARCs, so I commit to them. Usually, I’m looking for the first 5-10 ship points that will be useful to get off the board. This is very important. Known as “Know your win condition”. You will get better at this with experience. In a standard 75-ish minute match you will not kill your opponent’s entire list. So you need to choose your targets that your list can reasonably kill in the 6 or 7 round standard match that will put you ahead on points including objective pieces. Practicing with your list, you know you usually lose ship X and ship Y 80% of the time you play, and those ships equal 7pts, you should have a good feeling about your objective points in each scenario, this will give you an idea of how many ships you need to kill of theirs.
Don’t go for 20 points, go for the lead. Have a plan to get about 10 to 12 points of objectives and 10 to 12 points of ships, and adjust as needed to maintain a win condition throughout the match.
There are many options for choosing and placing obstacles. One option is large rocks, deployed as tight as possible in a triangle on one side of my opponent’s board. This gives them one big lane and one small lane, which makes it easy for me to see where ships will be going. Sometimes people try to fly in the center of the triangle, which really lets me know where they have to go the next round.
Assessing your win conditions, whether a certain engagement is favorable, and how to make engagements more favorable. If your opponent sets up such that a block of their ships is likely to move to a certain point in the board (say, the center), you need to decide whether you can win a joust against those ships with whatever portion of your list you can commit to them. If two players both commit to a joust, one of them is mathematically wrong. One joust block will have a statistical advantage. If you decide the opposing force has the advantage, you need to decide how to gain an advantage. Maybe one list is better at range 3 (more munitions), maybe one list is better at range 1 (Fangs), maybe you need to force the enemy formation to fly into a cluster of obstacles, or maybe you need to jam a reinforce off of a Decimator to stand any chance of killing it.
When to give up objective points is another important decision to make. Do you try to contest the center objective, or will doing so put you within multiple arcs of your opponent’s superior joust block? Do you claim a satellite with a lower initiative ship even if a higher initiative ship is likely to claim it back? Or do you focus and get mods to gain a combat advantage if they use their action to claim the objective? Any time you give up an objective, think about how you can make up those points later. If ignoring an objective lets you take a target lock, which lets you fire a proton torpedo, which gives you 4 points from killing an enemy ship you’ve traded up. If you know there are multiple high-value ships in the enemy list that you don’t have enough time to destroy, you need to take risks to control more objective points. Scenarios add a lot of decision-making to the game, if you’re not thinking about those decisions it’s easy to lose games and not realize what went wrong and how to improve future games.
Know your list: do your ships want/need to fly in formation or is there a pilot that wants to be a lone wolf? Which ship needs to move or engage first to maximize the effectiveness of your list? What triggers do you have in your list that you need to remember and pay attention to?
Also, and this is important, be flexible. Don’t stick to a losing plan.
Table Tips
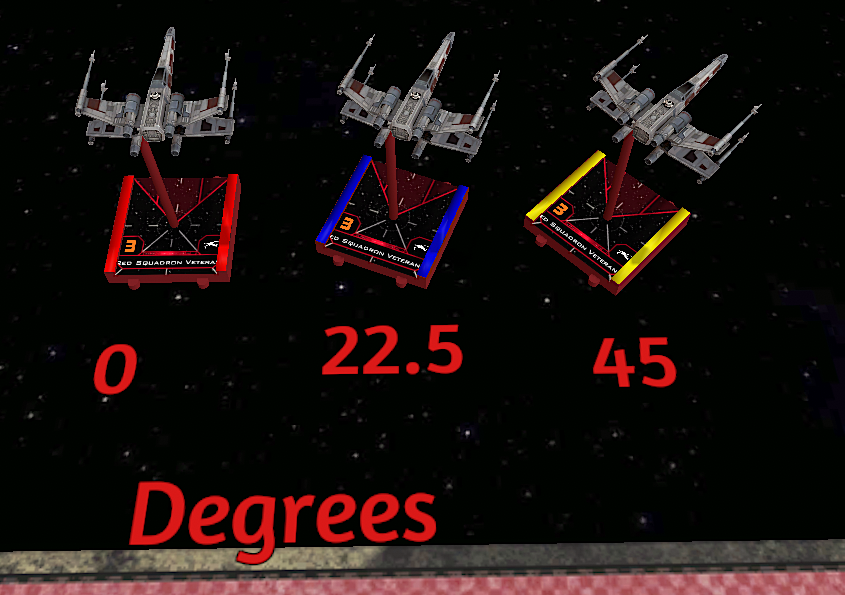
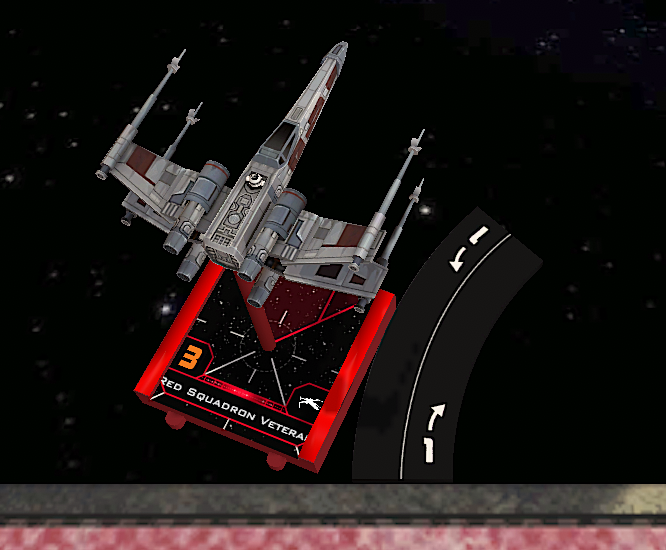
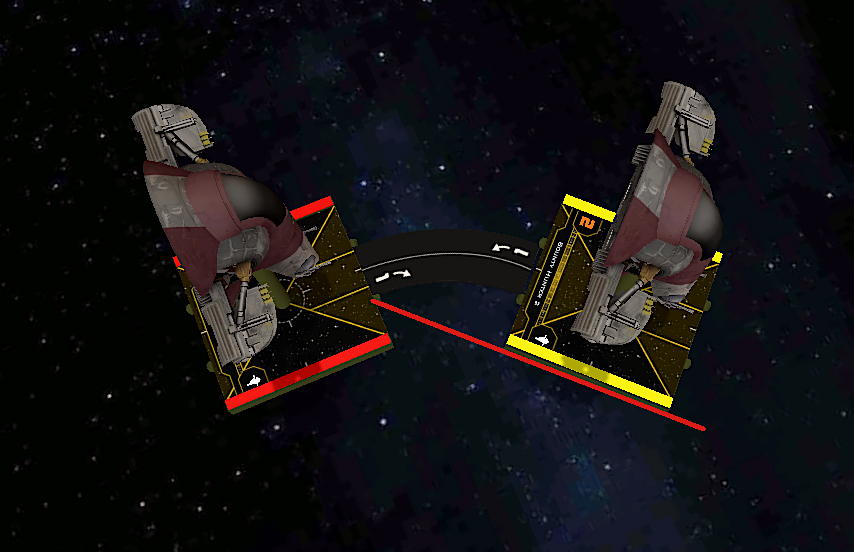
The 22.5-degree angle deployment trick. (Instead of deploying ships at the regular 90 and 45 degrees.) It makes it easier to dodge arcs and align bullseyes if you get used to not flying straight on. Arguably the best way is to set up both corners of a bank template against a straight edge, like the back edge of the mat for example, and place the ship alongside the bank template’s flat side.
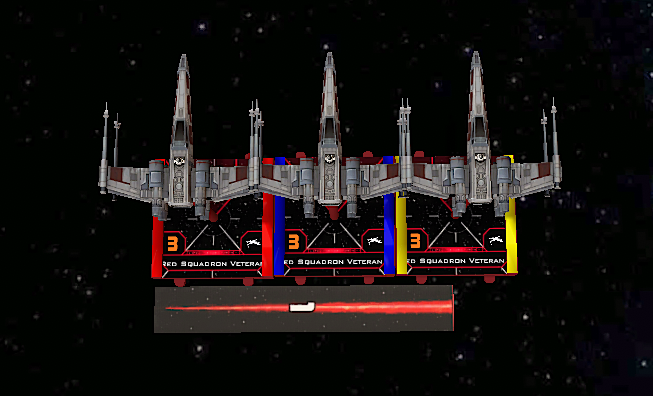
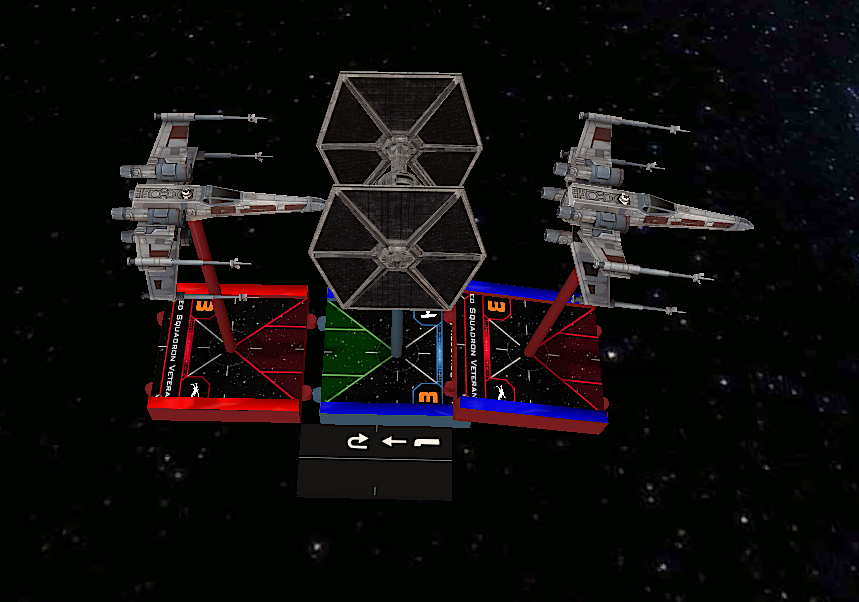
If you are flying ships in formation (next to each other, ahead/behind, or both), if you set up so that at least the width of a range ruler is between your ships, they will never bump if they perform the same maneuver. In practice, parallax exists, so leaving a little (literal) wiggle room is recommended.
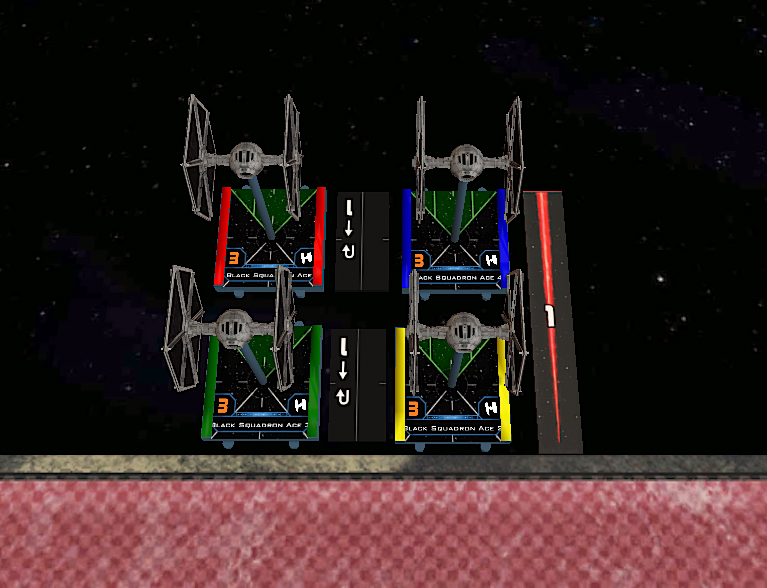
Off-setting your formation a bit helps reduce the risk of self-bumping on bank maneuvers. Set up one of the rows’ middle hash marks with the side of the other row.

Side arcs are slightly bigger than front back arcs, due to the cardboard being a rectangle. If you have a turret arc, it’s encouraged to have it out the side.
Planning and Activation Phase
Strategies
Have a plan for the match/objectives. A player with a plan > a player with no plan. It sounds silly but set up on your table while you watch TV and fly your list around, knowing what movement your ships can do will help when you’re in the thick of a real game. On the same point, practice different setups. Turns 0-2 are very important, if you know what your list will be doing for those turns it’s going to be a lot less mental load in a game.
Disengaging is always an option and should be used appropriately. A ship that’s on one hull can still participate fully and your opponent doesn’t score any points off of it. Don’t be afraid to disengage and regroup if there’s a better course of action to take.
Mods are really good, strive to have mods (focus, evade, target lock, etc.). Usually, a focus is the best choice because it’s both an offensive and defensive modification. Only take Target locks if I absolutely have to have them or I’m not taking incoming fire. Double mods (having a way to change blanks and focus results) on offense are the best way to end up with all hits.
Table Tips
Maneuver Chart
The length of a 1 straight is the same as a small base length and width. A large base is the length of a 2-straight. A medium base is 1 and a half straight.
A range is 2 and a half base lengths.
If an object (obstacle, ship, etc) isn’t in your firing arc then you’ll never hit it doing a bank move.
If you look down the front arc line, a hard turn will end up very close to the line.

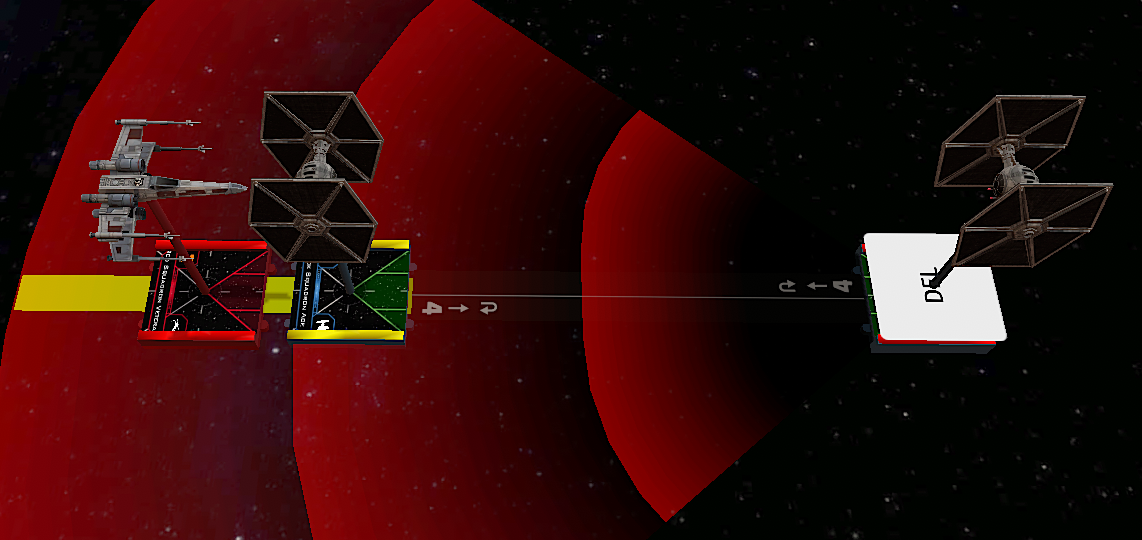
A 4-straight move is the same length as a range 2.
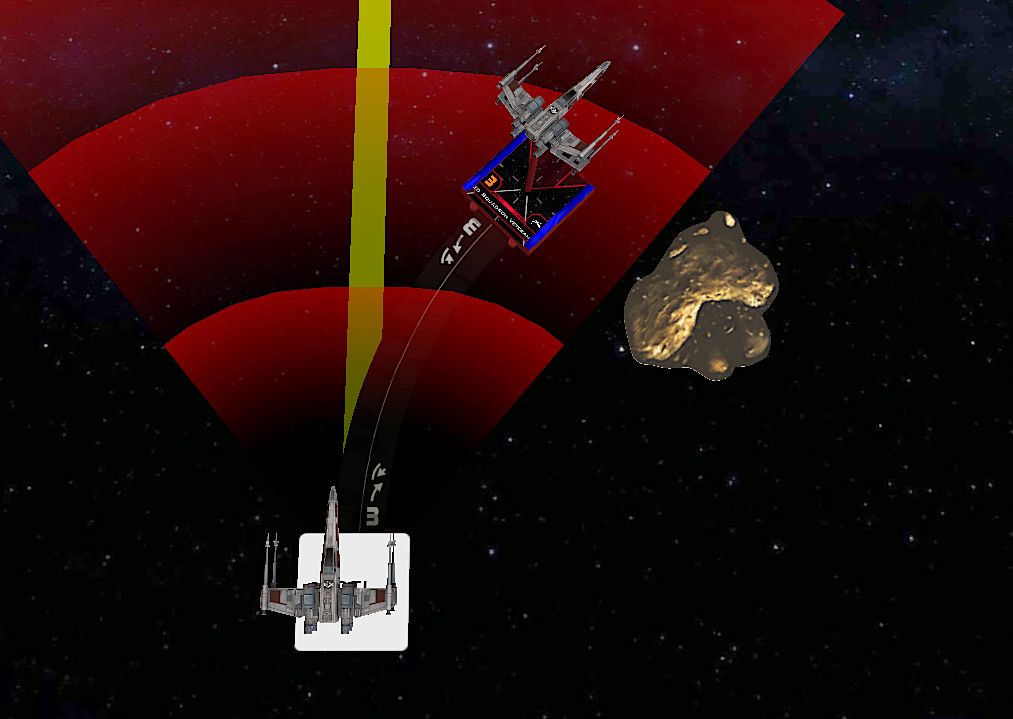
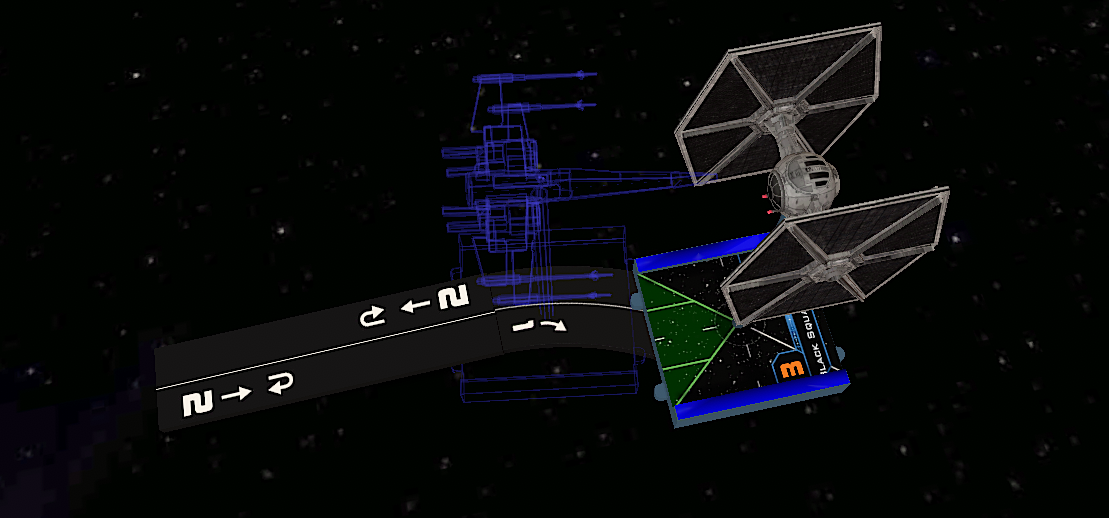
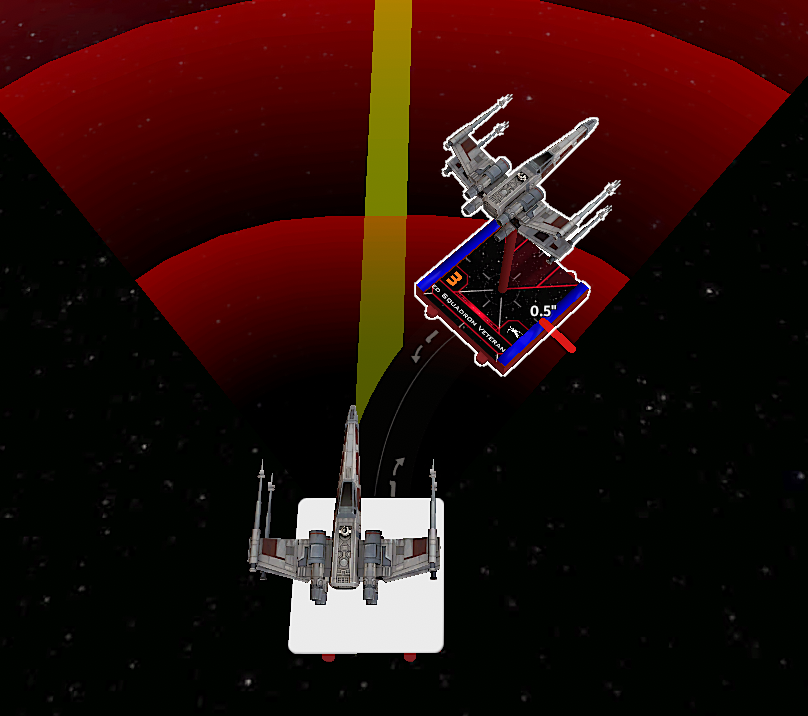
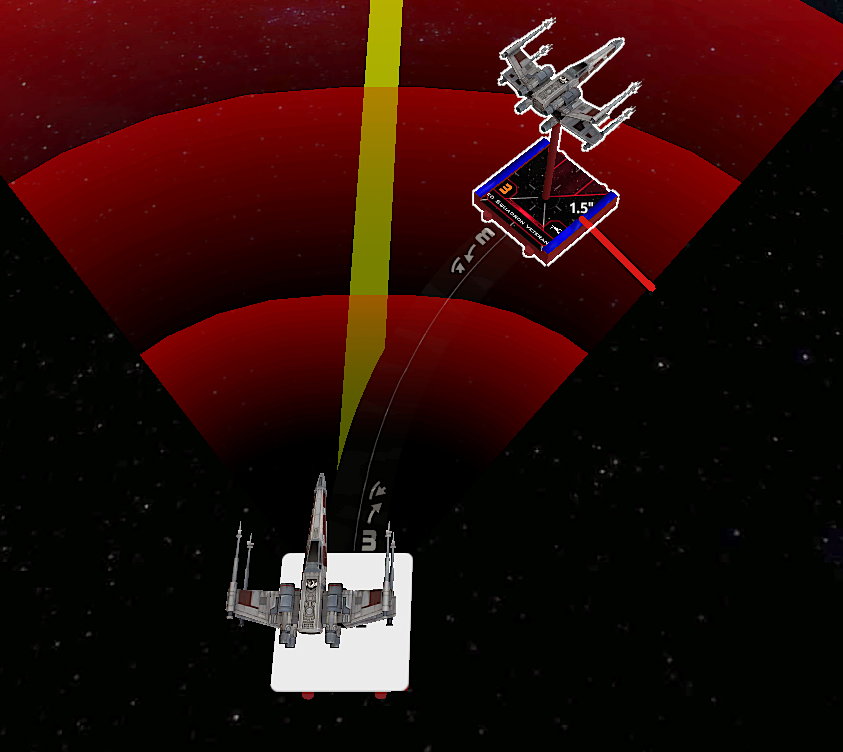
To help picture where your small-base ship will end up after a 2 hard turn, imagine it goes a 1 straight and does a barrel roll. That is roughly where the ship will end up. A hard 2 turn leaves your ship 2 bases ahead of where it is now and two bases to the side. (The 2 hard is there, just under everything else.)
If there’s an obstacle that’s placed as close to the edge as possible and your small base ship is just behind it and parallel to the board edge. A 4k will fit on the board.
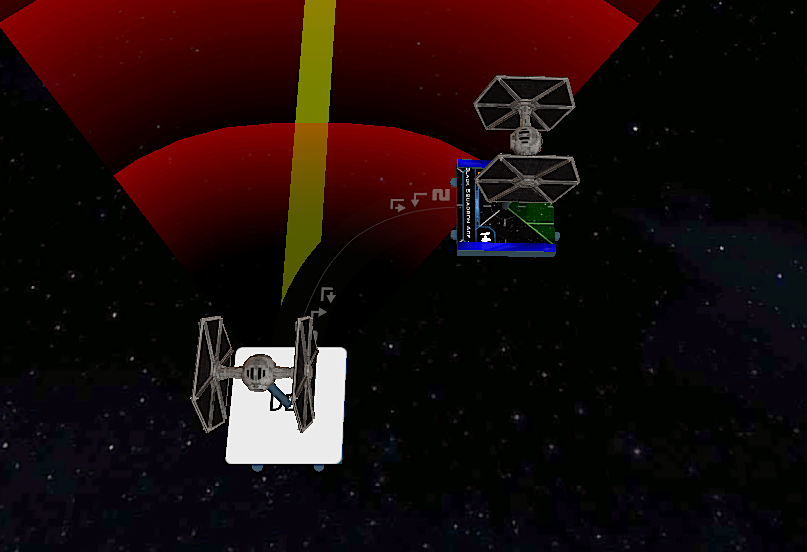
Similar to the measuring k-turns with the rock tip: if an enemy ship is wholly within range 2, a 5K will clear them.

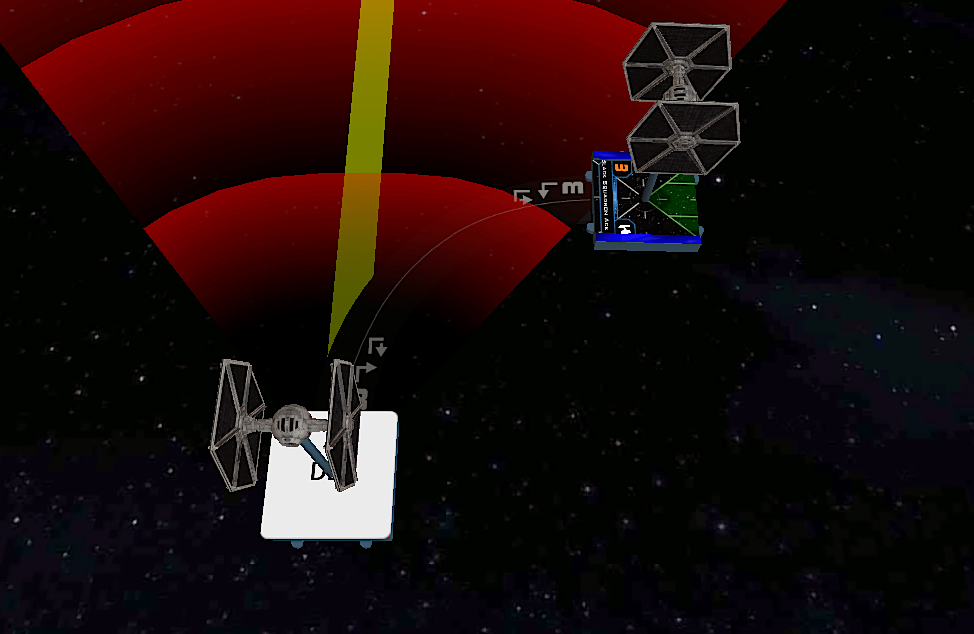
If a ship is wholly within range 1, a 3K will clear them.
If you are touching an enemy ship head-on, a 1 Straight will *not* clear because of the nubs on the base. Never forget the nubs!
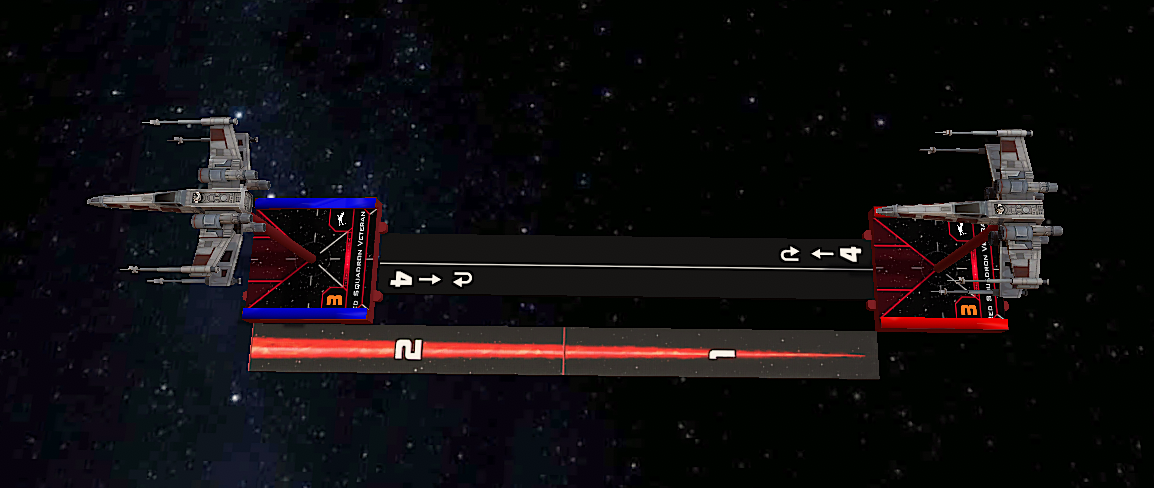
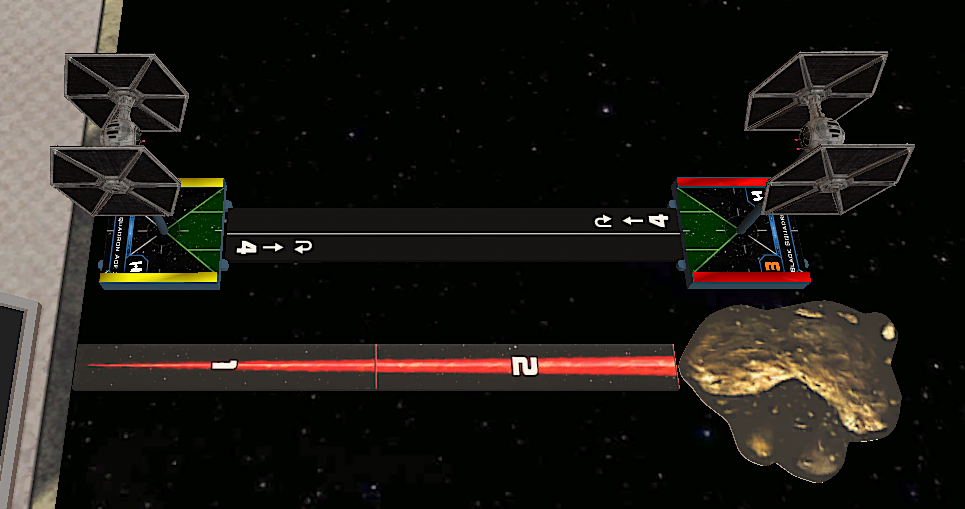
As a range band is 2.5 base lengths, range 2 is 5 base lengths. If an enemy was at range 3, you could fit a small base 4k without bumping into them.
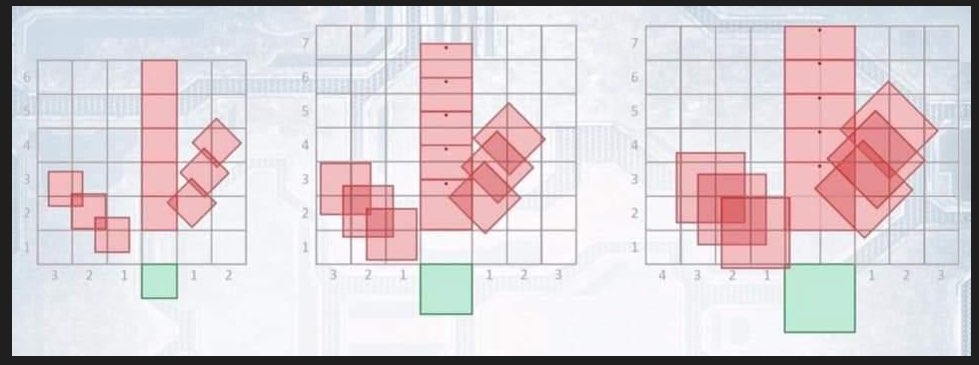
Rule of 11: if enemy ships are deployed as close to each other and straight across from each other, it’ll take a combined 11 base lengths to get range 3 shots. 14 for range 2 and 16 for range 1. Though the Rule of 11 can be called the Rule of 10.5 since Medium bases have existed.

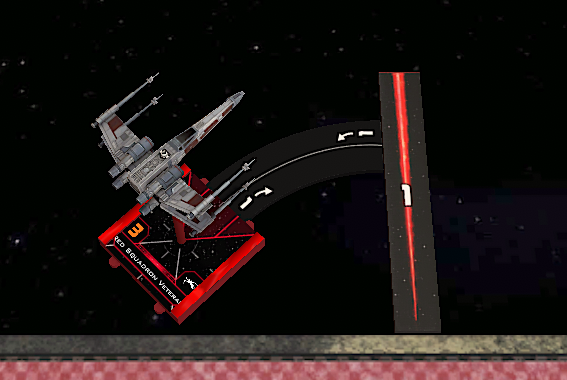
If a ship started parallel or at a 45-degree angle from the board edge (and hasn’t bumped), and is facing the board edge at a 45-degree angle, a hard turn will fit on the board.
To deploy a ship at a 45-degree angle, use a 1 bank with one side against a range 1 ruler. Put the ship on the other side of the range ruler. Range 1 ruler should be perpendicular to the board edge.
Don’t be afraid to ask someone not playing to help with a maneuver, if it looks close to bumping ships or overlapping an obstacle.
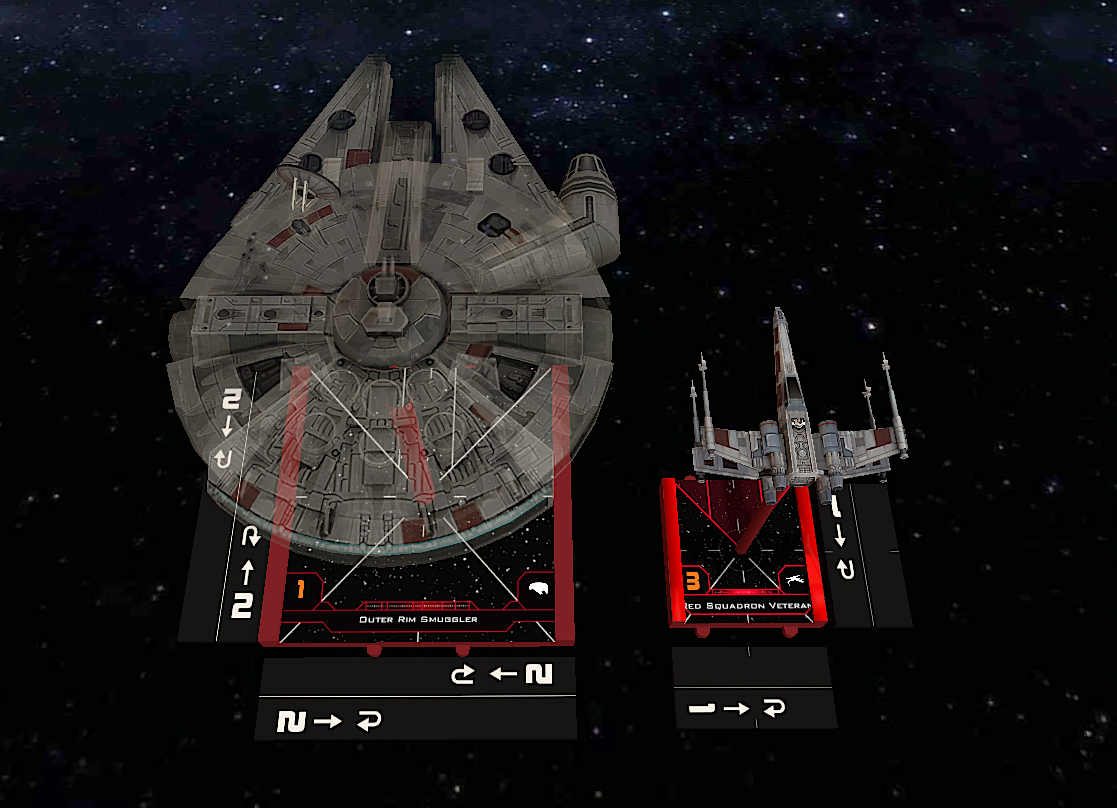
When a large base makes a 1 hard, the front corner of the base in the same direction as the turn is where the back corner will be after the maneuver.

An easy trick to visualize one banks is this. Imagine a 45-degree line coming out of the front of the base and the ship will be along that line. Small base off of the middle hash mark, large base off of the front arc line, and medium bases in between those two (about where the nub is).

If your ship bumps into another during its maneuver and it’s hard to tell where it lines up on the maneuver template, it’s okay to just kind of scoot it up and make it close enough. If you prefer to make it as accurate as possible, you can use the railroad track trick. Place a straight maneuver template at the back end of the ship’s maneuver template. The extra length of the line will help scoot the ship back into its correct bumped spot.

For very tight possible bumping maneuvers, a flashlight can help to show if it fits.
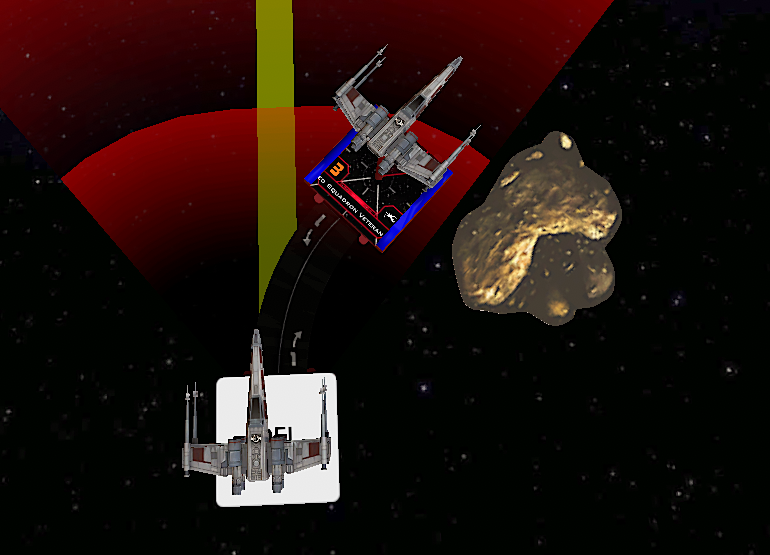
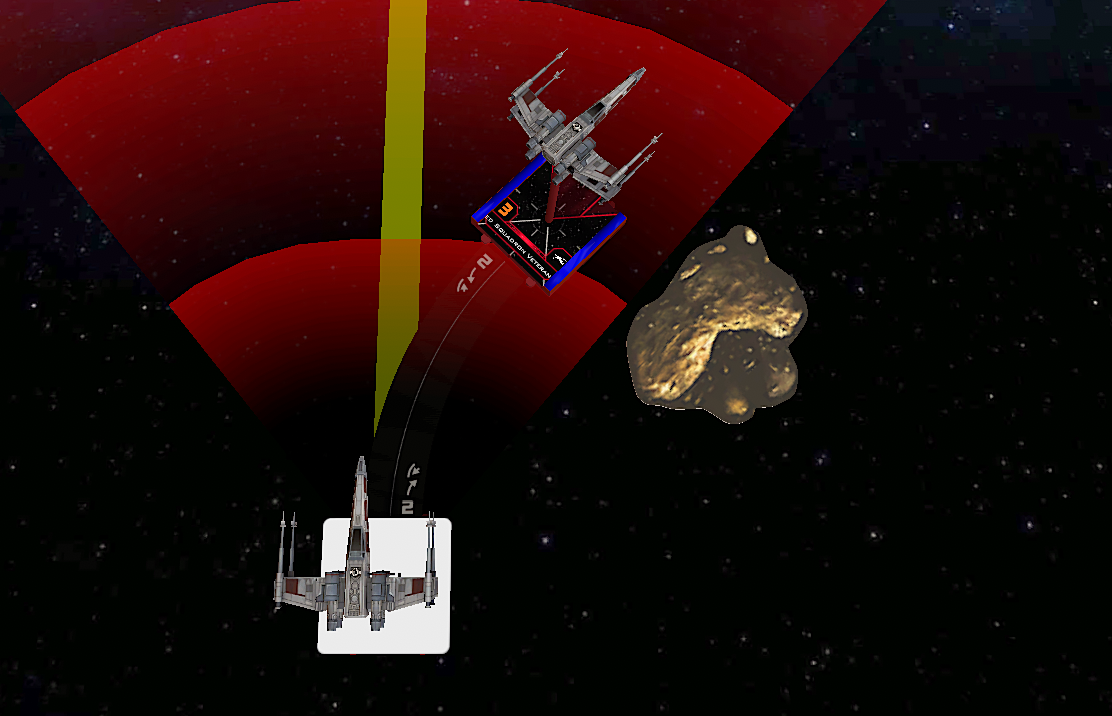
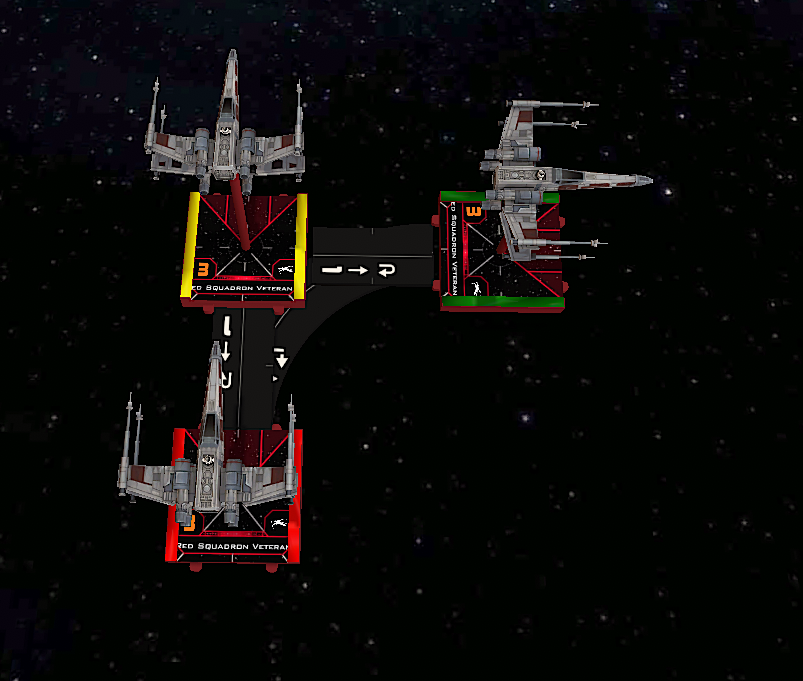
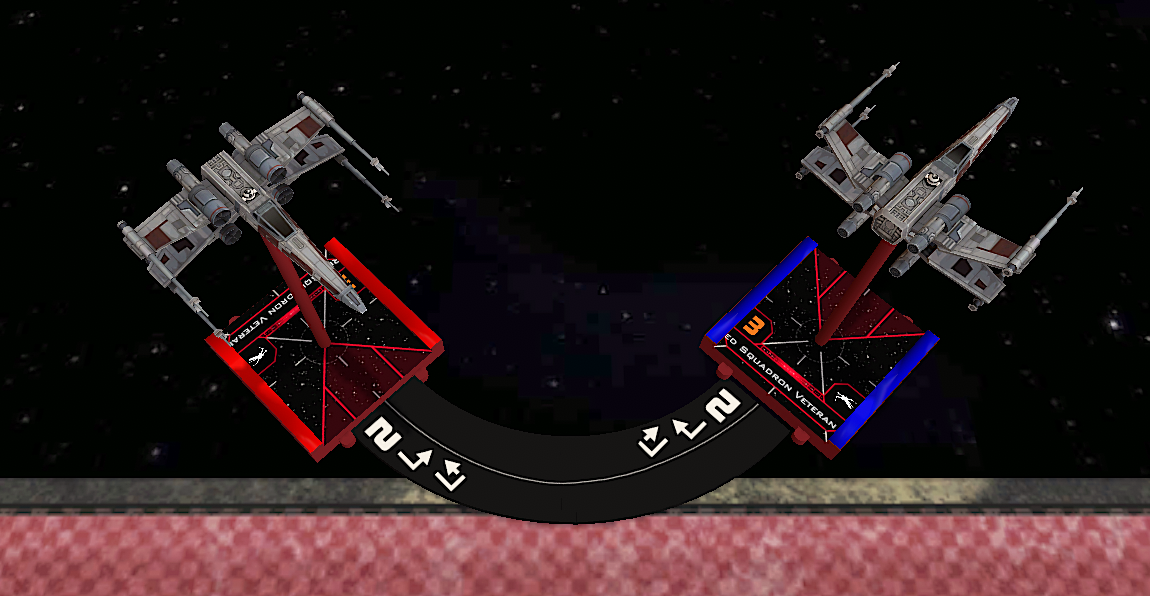
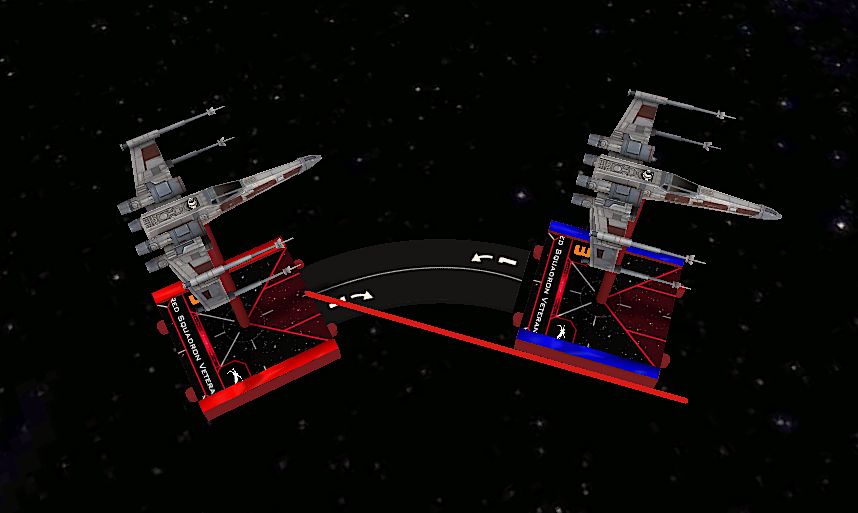
If you are trying to keep two ships adjacent when turning without bumping, remember the following: if doing a hard turn, the ship on the inside needs to do a speed 1, and the ship on the outside needs to do a speed 3. When banking, the ship on the outside needs to do a bank one speed higher than the inside ship.
Use the wiggle room. When you put a maneuver template in the nubs, it doesn’t fit perfectly. There’s a bit of wiggle room that you can use to shift your ship to the left or right just a bit.
Engagement Phase
Don’t be afraid to ask a third party friend to help with checking the range if it’s a close one.
Strategies
Probably the most important thing a new player can do is understand target priority and follow through on targets. Some squads function at a high level in part due to lack of focus fire by the entire player base (this is not new player specific). By committing most of your arcs to one target at a time over multiple rounds you can apply pressure to squads and players that might be used to preying on split fire or half-measured attempts to destroy things. Yes, it introduces the risk of being baited into a bad spot or allowing major flanks but often people end up in those situations anyway without doing meaningful damage early enough in the game, which is far worse. If something “looks” unkillable, super high HP, or too difficult to destroy it probably isn’t that bad to take down.
This matters vs more than just high hp high ship point pieces like Han or RAC (though those are the classic examples of things players let be comfortable with). The same thing applies to small base targets like Luke, Vonreg, Whylo, Quickdraw, Fenn, etc. Get at least 3-4 shots on target and take important pieces off the table early. Make your opponent’s worst possible timeline a reality.
The other side of that coin is to bring lists that function offensively without a bunch of conditional steps to get there and don’t deploy to spread out.
In Turn 1 or 2, whatever ship you damage (unless it would put you into a terrible spot) should be the thing you focus down first.
Don’t spread your damage out, try to focus on a single target as much as possible – unless you are on Chance Engagement and can get multiple half points.
Focus fire on a ship – this doesn’t mean flying in formation. You can approach enemy ships from different angles, but get multiple guns on a single target. One of the worst things you can do is split fire and do 20 damage to a list but kill 0 ships.
Focus does not mean “commit”. Some people fire on a ship, and it lives with 1 or 2 health, and they overcommit to destroying it and now all your ships are pointing in the wrong direction afterward, or got blocked by the injured ship, etc.
Focus means multiple guns on a single target. Because if you shoot at a ship that has a focus token for defense, and he spends the focus token. The next shot or two means he doesn’t have a focus token and your damage with the proceeding shots increases.
3 attack dice with focus vs. 2 agility with a focus = 1.07 expected dmg
If you did this three times. That is 3.21dmg.
However, if all three guns shoot at that ship in a single round, the expected damage is 3.7. Plus the chance of landing a game-changing crit goes from 25% to 60%, plus the chances that the ship keeps the focus for an attack is reduced, keeping your ships healthier. Many many benefits from focus fire.
Initiative kill. Love wiping out a ship before it can shoot.
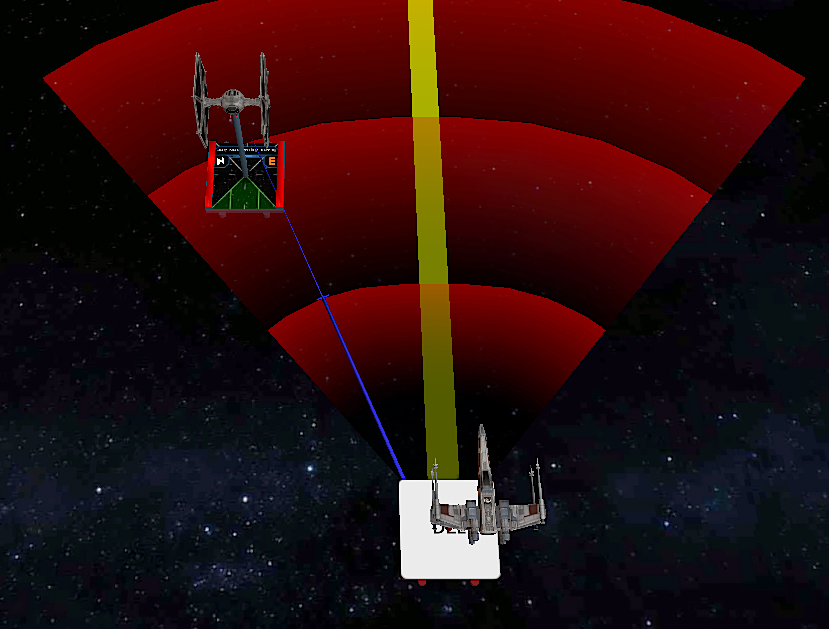
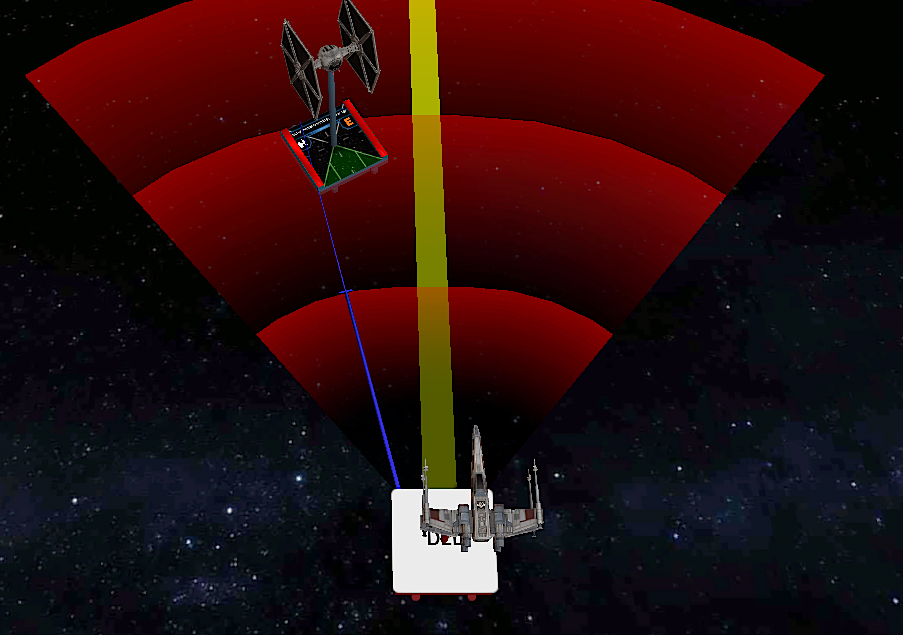
The one time you are allowed to measure without restriction is when choosing a target. Even when you can see “that’s obviously out of range 3” or “that’s obviously range 1”, you are still permitted to measure and check, and doing so can yield valuable information.
Table Tips
When checking the range for an attack (from the attacker’s cardboard base to the defender’s plastic base), there are typically only three spots where the closest to closest will be. Either the corner or the middle hash mark. Rarely will it be elsewhere.

Mods are generally better than extra dice.
A quick way to see which shoot statistically will do better. Add one for each die and mod. The higher number should end up with more results.
Example: 3 red dice with a lock and focus is 5 total. 4 red dice with a focus is 5 total. 2 green dice with force and elusive is 4 total. 3 green with an evade is 4 total.
A statistical roll for 3 red dice is hit, focus, blank. For 3 green it’s evade, focus, blank.
You’re more likely to roll evades or blanks than focus results on green dice.
Focus and Target Lock have equal math outcomes on offense (but Target Lock has benefits a focus token doesn’t so you can still differentiate them).
What is the significance of you’ll more likely roll evades or blanks than focus on green dice? Isn’t that similar to red dice too? Odds for green dice: evade ⅜, blank ⅜, and focus ¼. Red dice: hit ⅜, crit ⅛, focus ¼, blank ¼.
Remember what’s a dice modification with one simple acronym: ARCS! Add (die result), Reroll, Change, Spend.
After the Game
If you lose a game, don’t feel bad! Look for the moments you did well and try to recreate those. Look for moments that went poorly and find something that works better.
A quick debrief with your opponent can be very insightful. Ask them what they thought you did well and what could have been better.
Remember to have fun! We all play for different reasons, but it’s just a game at the end of the day.
Practice
For learning to maneuver: Toss some stuff on a table (preferably obstacles from the game), grab your templates, and a few bases.
Place the obstacles on a table. Practice flying around them. Leave one base where you started, put the template down, and place a new base. This lets you back up and try a different maneuver.
Try to get it close so you can see where the edge cases are. For instance: we know that anything outside your arc cannot be hit if you use a bank maneuver. But, higher-speed banks leave you farther inside that line. A 1-bank will leave the front of your ship almost on that line and the back of it a few mm inside it. A 2-bank is more like 1/3 of a base inside that line. And a 3-bank is about 2/3 of a base inside that line. (Or about half an inch for 1-bank, one inch for 2-bank, and an inch and a half for 3-bank.)

5-Objective Challenge
From Oli Pocknell
We can make everyone do the 5-objective challenge. Place 5 objective markers on the board and have each player figure out the minimum number of moves to hit all 5.
It’s one of the best ways to get to know a ship.
So the best way for this is to get used to how a ship flies, how it moves, and how the dial works with boost/barrel actions.
I would put 6 rocks on the table, place 5 or 6 objectives or focus tokens at random points around the table, and then starting from your deployment zone try to hit all the objectives in the shortest time.
Hard mode is planning the moves for all of them without moving the ship and then committing to them all.
You can make it harder by using focus tokens instead of objectives and then only allowed when the ship base lands and not the template overlaps.
A good thing to get you into it is starting when it counts for the template or the base, then making it harder so your ship base needs to hit the objective.
Practice Tips from Gold Squadron
Marcel
Fly the same list casually if you don’t have time for real practice. Make small tweaks to what you see, and find what works and what doesn’t. Understand your own tendencies, don’t be overconfident but also don’t be grumpy and down on yourself.
Ryan
Roll it back and fix it. Play 3 or 4 turns, stop, and scrutinize your own turn 0. Look at those early turns. Should you be doing something else? Is the goal you have a good one? Land on a rock, roll it back, and fix it, pick a different maneuver you already know you made a mistake.
Will
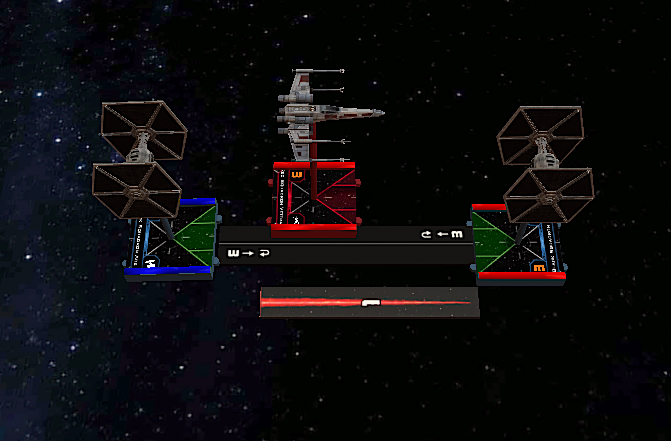
Play different lists. Get some expectations out of them. See how they fly. Know your enemy. Flying the same list, focus on where you want obstacles and setting up your ships. Ships on the edges, angle them in a little so they can get to the middle faster. Marcel’s open: two fast ships on the sides pointed at the middle and one in the middle, good for crashing on whatever side. Coming up with versatile deployments.
James
Same as above. Same list, working on turn 0. Flow chart with lots of “if this then that” for practice set up. Having a plan for going up against different meta lists and scenarios. Checklist your physical stuff and bring extra.
Dion
Identify something specific you want to practice. The more specific, the more finite, the more you will learn. But don’t have too many things you want to practice. Pick 2 or 3 things to focus on, so you don’t overload your brain.